Download Thinfinity Remote Desktop
Author: a | 2025-04-24

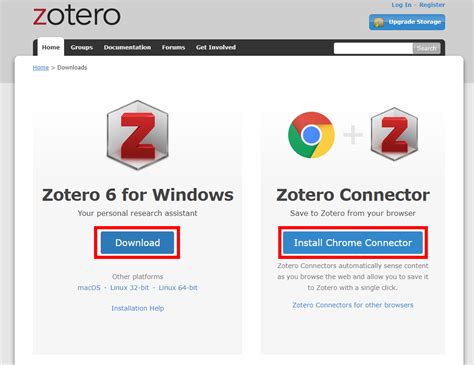
thinfinity remote desktop free download. View, compare, and download thinfinity remote desktop at SourceForge Installing Thinfinity Remote Desktop. Using Thinfinity Remote Desktop for the First Time. Customizing Thinfinity Remote Desktop
Thinfinity - ThinVNC is now Thinfinity Remote Desktop.
Thinfinity® VirtualUI 3.0With the new versions of Thinfinity Remote Desktop (v5.0) and Thinfinity VirtualUI (v3.0), you will be able to take advantage of our new Printer Agent. This will allow you to send your print jobs directly to your local(s) printer(s).Bear in mind this feature will only be available for the Enterprise editions. Now, let’s get started!The installation is very simple:0. First download the printer agent setup from the link below:Once you have downloaded the file, run the setup and follow these steps:In the ‘Welcome’ screen press ‘Next’Check ‘I accept the terms in the license agreement’ and press ‘Next’Check the box ‘Launch Thinfinity Virtual Channels Agent’ and click ‘Finish"Now that we have finished installing the agent, you should be able to see it as a small icon in your system tray. You can right-click it and select ‘Setup Printer’ to configure your printer(s)The agent should look similar to thisYou can see there are two different sections in the agent. There is a combo-box to choose a printer and a checkbox list that will show all your available printers. In the combo-box you will select the default printer you want the “Thinfinity Remote Desktop Printer / Thinfinity VirtualUI Printer” to send the job to. If you leave this combo-box blank, like below, it will send the job to the normal remote printer, which will create a pdf and print to the browser.The redirected printers box will let you select which other printers you wish to have available on the “remote desktop/application’. Below there's a practical example to understand this betterIn the screenshot above you can see a few printers that show ‘(redirected)’ on its name. These printers are the ones you have ‘checked’ in the ‘Redirected Printers’ box. If you send the print job to “Thinfinity Remote Desktop Server Printer” (or Thinfinity VirtualUI Printer) as shown in the screenshot below, the job will go to your local ‘Microsoft Print to PDF’ (the printer you chose in the combo-box)You will still be able to choose a different local printer if you wish (the ones allowed in the ‘Redirected Printers’ box).Keep in mind, thinfinity remote desktop free download. View, compare, and download thinfinity remote desktop at SourceForge Installing Thinfinity Remote Desktop. Using Thinfinity Remote Desktop for the First Time. Customizing Thinfinity Remote Desktop Open your preferred HTML5-enabled web browser in the computer where Thinfinity® Remote Desktop was installedType the following URL: into the address bar. If you have changed the port number in the previous step, replace the port number in this URL. When you access from a different computer, replace 127.0.0.1 with the server IP address or DNS nameYou will be presented with the following screen:In the 'Computer' field, enter the remote desktop IP you want to connect toEnter the Username and Password for the remote machineThe remote desktop will show inside the browser and you can use it like a regular remote desktop sessionIf you want to change the RDP connection settings, press the plus (+) sign on the right upper corner before connecting and the Display, Program, Experience, Advanced and Resources options will show.To set up different options and make Thinfinity® Remote Desktop better suit your needs, read the Customizing Thinfinity® Remote Desktop topic.Comments
Thinfinity® VirtualUI 3.0With the new versions of Thinfinity Remote Desktop (v5.0) and Thinfinity VirtualUI (v3.0), you will be able to take advantage of our new Printer Agent. This will allow you to send your print jobs directly to your local(s) printer(s).Bear in mind this feature will only be available for the Enterprise editions. Now, let’s get started!The installation is very simple:0. First download the printer agent setup from the link below:Once you have downloaded the file, run the setup and follow these steps:In the ‘Welcome’ screen press ‘Next’Check ‘I accept the terms in the license agreement’ and press ‘Next’Check the box ‘Launch Thinfinity Virtual Channels Agent’ and click ‘Finish"Now that we have finished installing the agent, you should be able to see it as a small icon in your system tray. You can right-click it and select ‘Setup Printer’ to configure your printer(s)The agent should look similar to thisYou can see there are two different sections in the agent. There is a combo-box to choose a printer and a checkbox list that will show all your available printers. In the combo-box you will select the default printer you want the “Thinfinity Remote Desktop Printer / Thinfinity VirtualUI Printer” to send the job to. If you leave this combo-box blank, like below, it will send the job to the normal remote printer, which will create a pdf and print to the browser.The redirected printers box will let you select which other printers you wish to have available on the “remote desktop/application’. Below there's a practical example to understand this betterIn the screenshot above you can see a few printers that show ‘(redirected)’ on its name. These printers are the ones you have ‘checked’ in the ‘Redirected Printers’ box. If you send the print job to “Thinfinity Remote Desktop Server Printer” (or Thinfinity VirtualUI Printer) as shown in the screenshot below, the job will go to your local ‘Microsoft Print to PDF’ (the printer you chose in the combo-box)You will still be able to choose a different local printer if you wish (the ones allowed in the ‘Redirected Printers’ box).Keep in mind,
2025-04-07Open your preferred HTML5-enabled web browser in the computer where Thinfinity® Remote Desktop was installedType the following URL: into the address bar. If you have changed the port number in the previous step, replace the port number in this URL. When you access from a different computer, replace 127.0.0.1 with the server IP address or DNS nameYou will be presented with the following screen:In the 'Computer' field, enter the remote desktop IP you want to connect toEnter the Username and Password for the remote machineThe remote desktop will show inside the browser and you can use it like a regular remote desktop sessionIf you want to change the RDP connection settings, press the plus (+) sign on the right upper corner before connecting and the Display, Program, Experience, Advanced and Resources options will show.To set up different options and make Thinfinity® Remote Desktop better suit your needs, read the Customizing Thinfinity® Remote Desktop topic.
2025-04-181. Open your preferred HTML5-enabled web browser in the computer where Thinfinity® Remote Desktop was installed.2. Type the following url: into the address bar. If you have changed the port number in the previous step, replace the port number in this URL. When you access from a different computer, replace 127.0.0.1 with the server IP address or DNS name.You will be presented with the following screen:ThinRDP Server HTML5, Web-based RDP remote desktop control web start page connection3. In the 'Computer' field, enter the remote desktop IP you want to connect to.4. Enter the Username and Password for the remote machine.5. Press 'Connect'.6. The remote desktop will show inside the browser and you can use it like a regular remote desktop session.If you want to change the RDP connection settings, press the plus (+) sign on the right upper corner before connecting and the Display, Program, Experience, Advanced and Resources options will show.To set up different options and make Thinfinity® Remote Desktop suit better your needs, read the Customizing Thinfinity® Remote Desktop Server topic.
2025-04-04